
How to Use Aperture Priority Mode for Creative Control?

Introduction: Why Aperture Priority Mode Matters?
Ever wished you could control your lens’s depth of field without worrying about exposure every time? Aperture Priority Mode (marked as A or Av on your camera dial) strikes the perfect balance: you set the creative aperture, and the camera handles the shutter speed. It’s the go-to for photographers—beginners and pros alike—who want beautiful separation, tack-sharp landscapes, or cinematic bokeh with ease. Think creative freedom with built-in exposure safety. Ready to master it?
If you're just getting started, take a quick dive into what aperture in photography means to build a strong foundation before using it creatively.
Key Takeaways:
Aperture Priority mode (A or Av) lets you control depth of field creatively while the camera automatically adjusts shutter speed for balanced exposure.
Wide apertures (like f/1.8 or f/2.8) create dreamy background blur, perfect for portraits and subject isolation.
Narrow apertures (like f/11 or f/16) increase sharpness across the frame, ideal for landscapes and group shots.
Use exposure compensation (+/-) to fine-tune brightness without switching modes.
Understanding f-stops and lens behavior is crucial to avoid common exposure issues and get the look you want.
Watch for slow shutter speeds in low light to prevent blur—use a tripod or raise ISO if needed.
Combine Aperture Priority with Auto ISO to simplify workflow and handle lighting changes smoothly.
Practice with different subjects and lighting to build confidence and intuition with creative control.
Aperture Priority fits well into both beginner and pro workflows, giving a balance between automation and manual control.
Avoid common mistakes like ignoring background distractions, over-relying on wide apertures, or misjudging depth of field.
1. What Exactly is Aperture Priority Mode?
Aperture Priority (A / Av) is a semi-automatic shooting mode—you pick the aperture (f-stop), and the camera picks the shutter speed for proper exposure. Want blurred backgrounds? Choose wide apertures like f/1.8–f/4. Need everything sharp? Stop it down to f/8–f/16.
This mode gives creative control without sacrificing exposure accuracy—making it ideal in changing light or fast-shooting scenarios.
2. When & Why You Should Use It?
Best for subjects where you care about depth of field more than shutter timing, such as:
Portraits, for dreamy background blur (bokeh) — f/1.8–f/2.8
Landscapes or architecture, for edge-to-edge sharpness — f/8–f/16
Street, macro, wildlife, or travel, where light and composition shift rapidly
On forums like Reddit, one user notes:
“For 95% of the time, I am in Aperture priority mode… Very seldom do I go in P or S modes!”
3. Step-by-Step Setup Guide
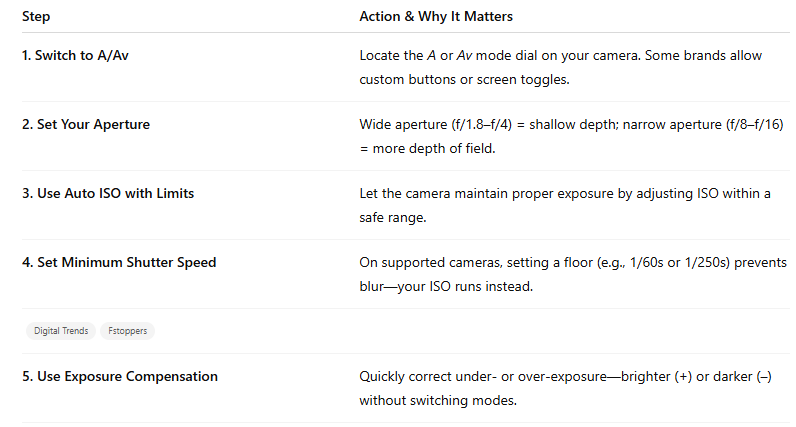
4. Pro Tips & Real-World Tricks
Find your lens's “sweet spot” (usually f/8–f/11) for maximum sharpness with minimal diffraction.
Use Auto-ISO with a minimum shutter speed, especially helpful on DSLRs/mirrorless to avoid motion blur.
Pair with AE-L (Auto Exposure Lock) to lock exposure while recomposing—resulting in clean and consistent frames.
Study the real world: Reddit feedback helps too:
“Aperture priority allows you to set the aperture manually, and then it does everything else (shutter, ISO).”
5. When Not to Use It?
Avoid Aperture Priority when:
You're bracket shooting or focus stacking—Manual mode gives full exposure control.
Shooting star trails or using Bulb mode—you need long exposures beyond what the camera’s meter can manage.
Using flash in mixed or studio environments—manual gives predictable results every time.
What Creative Effects Can You Achieve With Aperture Priority?
Aperture Priority mode lets you control depth of field, allowing for beautifully blurred backgrounds in portraits or sharp focus across landscapes. You can also manipulate light creatively for mood and tone without worrying about shutter speed.
Subject isolation and bokeh
By using a wide aperture like f/1.8 or f/2.8, you can isolate your subject from the background with beautiful, creamy bokeh. This is ideal for portraits, engagements, or product photography.
Environmental shots with context
Choose a slightly narrower aperture (f/4 or f/5.6) to add some context—enough background in focus to provide a setting, without losing subject emphasis.
Landscapes and architectural clarity
Use f/8–f/16 to ensure sharpness across the frame. Aperture Priority helps keep things fast and flexible, especially when light changes or when handheld shooting. Since aperture directly controls the depth of field, learning how aperture affects depth of field will help you create dramatic or cleanly focused shots.
How to Avoid Common Aperture Priority Mistakes?
Avoid setting your ISO too high or low, and watch for shutter speeds that drop too slow in low light—leading to motion blur. Always double-check your exposure compensation and review histograms for balanced lighting.
Mistake #1: Choosing an aperture too wide for the subject
If you set f/1.8 and subjects at different distances, only one may be sharp. When shooting groups, narrow your aperture to f/5.6 or higher to include everyone in focus.
Mistake #2: Creating motion blur in low light
Wide apertures reduce the depth of the field but also lower the shutter speed. If the shutter speed drops below about 1/60s, you may get blur from camera or subject movement. Use a tripod or increase ISO to keep the shutter speed high enough.
Mistake #3: Over-reliance on auto ISO
Auto ISO is helpful, but if it raises sensitivity too high, you can introduce noise in shadows. Set a max ISO limit (e.g., ISO 1600) to maintain quality.
Mistake #4: Neglecting exposure compensation
Aperture priority mode obeys your aperture but decides the shutter speed. If scenes are very bright or dark, the camera might underexpose or overexpose. Use exposure compensation (+/− EV) to make fine adjustments.
Even in Aperture Priority mode, beginners often make avoidable exposure errors—learn how to spot and fix common aperture mistakes.
When Should You Use Aperture Priority Mode?
Portrait photography: To blur the background and emphasize the subject.
Editorial and street photography: To adapt quickly to changing light while maintaining creative depth.
Wedding photography: Gives a consistent look and flexibility for spontaneous moments.
Environmental illustrations: Use f/4‑f/5.6 to balance subject isolation with background context.
For full manual control or creative long exposures, switch to Manual Mode only when needed.
What Are the Technical Tips for Better Results?
Use exposure compensation to fine-tune brightness, and monitor your shutter speed to prevent camera shake, especially when shooting handheld. Pair it with spot or matrix metering for better control over exposure in high-contrast scenes.
Use the depth-of-field preview
If your camera supports it, hold the DOF preview button to preview what your final aperture choice will look like in terms of focus range.
Check your histogram
Never rely solely on live-view brightness. Check the histogram and overexposure warning to ensure your shutter speeds and ISO choices are balanced.
Shoot RAW
That way you retain maximum detail and flexibility in post‑processing, especially if exposure compensation or ISO adjustments were needed.
Know your lens sweet spot
Most lenses perform best around f/5.6–f/8. At extreme apertures like f/1.4 or f/22, lens diffraction can soften images.
If you're unsure what those f/2.8 or f/16 numbers really mean, understanding f-stop numbers is essential to mastering Aperture Priority mode. To truly harness Aperture Priority mode, you should understand how it interacts with shutter speed and ISO for balanced exposure.
How to Practice Aperture Priority Mode Efficiently
Practice by photographing the same subject at different f-stops to understand depth of field changes. Use varied lighting conditions and subjects like flowers, people, or architecture to explore its full creative potential.
Try the same scene at different apertures: Shoot at f/2.8, f/5.6, f/11 and compare results, focusing on background sharpness, exposure, and motion blur.
Vary distances: Shoot the same portrait at differing distances and apertures. Notice how subject isolation changes.
Outdoor vs indoor: Practice both in sunlight and dim environments to observe how Auto ISO adapts.
This deliberate practice builds awareness of how aperture and camera decisions affect final imagery. Different genres of photography require different aperture settings—check out the best aperture settings for each type to fine-tune your creative control.
How Does Aperture Priority Mode Fit Into Your Workflow?
It offers a fast, semi-automatic way to retain creative control over focus and background blur without the complexity of full Manual mode—perfect for fast-paced shoots or when lighting changes quickly.
Pre-shoot prep
Decide your depth-of-field goal: dreamy blur or broad clarity.Camera setup
Dial into A/Av mode, set aperture, start with Auto ISO, and enable exposure compensation.Compose and shoot
Frame your subject, check focus accuracy, and press the shutter.Review and adjust
After each series, review your shots, check the histogram, and adjust exposure compensation or ISO limit, if needed.Post-process if needed
Edit RAW files to adjust exposure, contrast, and clarity without impacting depth of field.
Why Learning Aperture Priority Mode Makes You a Better Photographer
Using Aperture Priority Mode helps you:
See the immediate effect of aperture on depth of field.
Build intuition for how f-stops influence focus and background blur.
Gain speed and reliability—even in shifting light or moving subjects.
Avoid technical missteps that beginners often make by controlling critical creative elements and letting the camera handle the rest.
Final Thoughts: Mastering Aperture while Staying Agile
Aperture Priority Mode strikes the perfect balance between creative aperture control and technical simplicity. This mode empowers you to shape your images with intentional depth-of-field while automatically adjusting exposure, reducing risk, and speeding up your shooting workflow.
By practicing consistently and understanding how to adjust aperture (and occasionally ISO or exposure compensation), you can confidently craft every shot—from dramatic landscapes to engaging portraits—with both creative vision and technical accuracy.
G10 Studio provides exceptional photography services in Aruba. Contact now!
FAQs:
Q1. What does Aperture Priority mode do?
You choose the aperture (f-stop), and the camera automatically picks the shutter speed and sometimes the ISO for proper exposure.
Q2. Why use Aperture Priority instead of Manual mode?
It offers creative control over depth of field without adjusting every setting manually—perfect for dynamic environments.
Q3. Can I stop shutter blur in Aperture Priority?
Yes—by setting a minimum shutter speed in the camera’s Auto-ISO configuration, ISO increases instead of a slow shutter.
Q4. What aperture is best for portraits?
Use wide apertures like f/1.8–f/2.8 for soft backgrounds and strong subject separation.
Q5. What aperture is ideal for landscapes?
Stop down to f/8–f/16 for extensive depth of field and landscape sharpness.